





Magento Tutorial
How Tideways Helped Us Uncover the Hidden Bottlenecks in a Slow Magento PLP
Mahaveer Devabalan|Dec 26, 2025|Read 3 Min



Gateway Command is a Magento payment gateway component that takes the payload required by a specific payment provider and sends, receives, and processes the provider’s response. A separate gateway command is added for each operation (authorization, capture, etc.) of a specific payment provider.
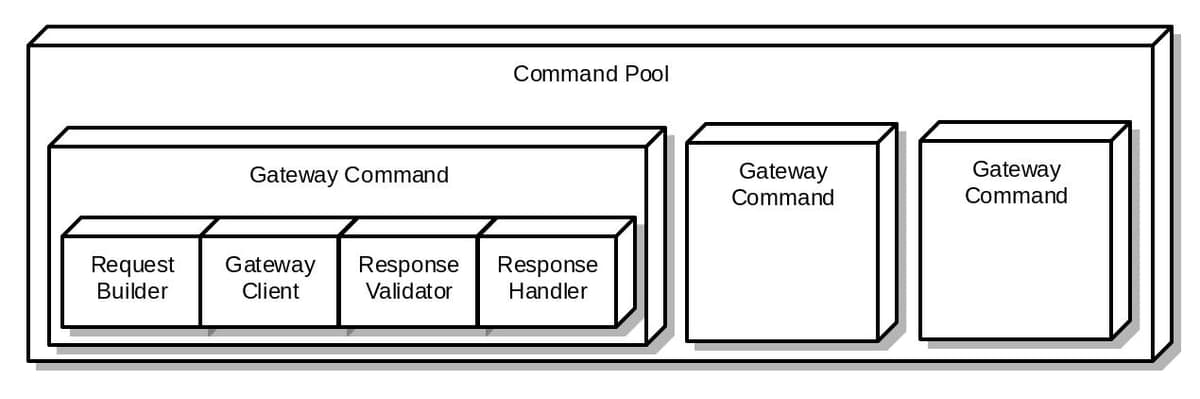
Gateway commands were introduced in Magento 2 to deal with payment gateways, but they can be used in other ways as well such as calling external APIs and processing their response in magento 2 applications.
Let’s take a look at how a Gateway Command actually works.
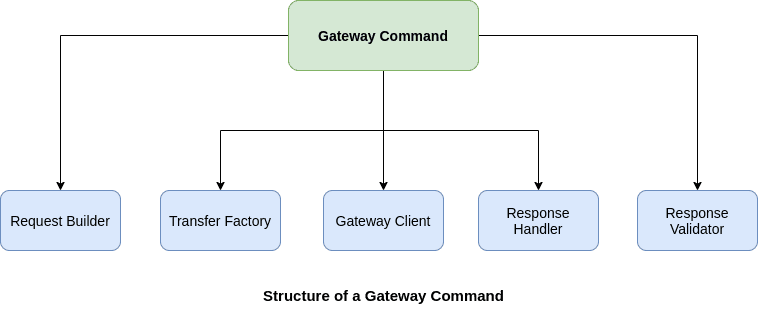
There are 5 main components of a Gateway command. They are as follows:
<virtualType name="ExternalApiCall" type="Magento\Payment\Gateway\Command\GatewayCommand">
<arguments>
<argument name="requestBuilder" xsi:type="object">ExternalApiAuthTokenRequest</argument>
<argument name="transferFactory" xsi:type="object">Vendor\Module\Gateway\Http\TransferFactory</argument>
<argument name="client" xsi:type="object">Vendor\Module\Gateway\Http\Client\TransactionSale</argument>
<argument name="handler" xsi:type="object">ExternalApiAuthTokenHandler</argument>
<argument name="validator" xsi:type="object">Vendor\Module\Gateway\Validator\ResponseValidator</argument>
</arguments>
</virtualType>
Let’s dive into each of the above points separately.
Request Builder is the component of the gateway command that is responsible for building a request from several parts. It enables the implementation of complex, yet atomic and testable, building strategies. Each builder can contain builder composites or have simple logic.
This is the component which gathers the information from different sources and creates the request payload for the API call.
The basic interface for a request builder is
\Magento\Payment\Gateway\Request\BuilderInterface. Our class should always implement the above interface. The BuilderInterface has a method called “build” which takes a parameter called “buildSubject” which is of type array and returns an array as a result which contains the data which you need to have in the request payload.
The parameter “buildSubject” contains the data which has been passed to the API call at the time of call from any class.
\Magento\Payment\Gateway\Request\BuilderComposite is a container for a list of \Magento\Payment\Gateway\Request\BuilderInterface implementations. It gets a list of classes, or types, or virtual type names, and performs a lazy instantiation on an actual BuilderComposite::build([]) call. As a result, you can have as many objects as you need, but only those required for a request for your API call are instantiated.
BuilderComposite implements the composite design pattern.
The concatenation strategy is defined in the BuilderComposite::merge() method. If you need to change the strategy, you must include your custom Builder Composite implementation.
Adding a builder composite
Dependency injection is used in di.xml to add builder composites. A builder composite may include both simple builders as well as other builder composites.
Below is an example of adding request builders through BuilderComposite class.
<virtualType name="ExternalApiAuthTokenRequest" type="Magento\Payment\Gateway\Request\BuilderComposite">
<arguments>
<argument name="builders" xsi:type="array">
<item name="customer" xsi:type="string">Vendor\Module\Gateway\Request\CustomerDataBuilder</item>
<item name="authData" xsi:type="string">Vendor\Module\Gateway\Request\AuthDataBuilder</item>
</argument>
</arguments>
</virtualType>
Transfer Factory enables the creation of transfer objects with all data from request builders. Gateway Client then uses this object to send requests to the gateway processor.
Transfer Builder is used by Transfer Factory to set the required request parameters.
The basic Transfer Factory interface is Magento\Payment\Gateway\Http\TransferFactoryInterface.
The TransferFactoryInterface has a method called “create” which accepts an array parameter which has all the request data merged and sets the data as body of the API call and returns the created object for the gateway client to transfer.
Below is an example of the above method:
public function create(array $request)
{
return $this->transferBuilder
->setBody($request)
->build();
}
In this example, the transfer factory simply sets request data with Transfer Builder and returns the created object
Below is an example of a more complicated behavior. Here transfer factory sets all required data to process requests using API URL and all data is sent in JSON format.
public function create(array $request)
{
return $this->transferBuilder
->setMethod(Curl::POST)
->setHeaders(['Content-Type' => 'application/json'])
->setBody(json_encode($request, JSON_UNESCAPED_SLASHES))
->setUri($this->getUrl())
->build();
}
Gateway Client is a component of the Magento Gateway Command that transfers the payload to the gateway provider and gets the response.
The basic interface for a gateway client is Magento\Payment\Gateway\Http\ClientInterface.
A gateway client receives a called Transfer object. The client can be configured with a response converter using dependency injection via di.xml.
The below gateway client implementations can be used out-of-the-box:
\Magento\Payment\Gateway\Http\Client\Zend
\Magento\Payment\Gateway\Http\Client\Soap
Example
Below is an example of how a Zend client can be added in di.xml:
...
<virtualType name="ExternalApiJsonConverterZendClient" type="Magento\Payment\Gateway\Http\Client\Zend">
<arguments>
<argument name="converter" xsi:type="object">Vendor\Module\Gateway\Http\Converter\JsonConverter</argument>
<argument name="logger" xsi:type="object">CustomLogger</argument>
</arguments>
</virtualType>
...
The above Converter class must implement “Magento\Payment\Gateway\Http\ConverterInterface” interface which has a method called “convert”. We can implement that method in our custom converter class and process the data and convert to the desired form.
Response Handler is the component of Magento Gateway Command, that processes gateway provider response. In other words, it is used to process the response received from the API. The handler class can be used to perform any type of processing on the received response data. Some of the operations may be as follows:
Basic interface for a response handler is Magento\Payment\Gateway\Response\HandlerInterface
\Magento\Payment\Gateway\Response\HandlerChain might be used as a basic container of response handlers,
The following is an example of Response Handler class:
public function handle(array $handlingSubject, array $response)
{
$cacheData = [];
$oauthTokenObject = $this->oauthTokenInterfaceFactory->create();
$this->dataObjectHelper->populateWithArray(
$oauthTokenObject,
$response,
Vendor\Module\Api\Data\OauthTokenInterface'
);
$cacheData[OauthTokenInterface::EXPIRE_TIME] = $expiresTime;
$cacheData[OauthTokenInterface::BEARER_TOKEN] = $oauthTokenObject->getAccessToken();
$this->cache->save(
$this->jsonEncoder->encode($cacheData),
self::CACHE_ID,
[\Magento\Framework\App\Cache\Type\Config::CACHE_TAG]
);
}
The above method is getting the oAuth token data in response and as part of the operation, it is storing the latest token in cache for further usage of the APIs.
Response Validator is a component of the Magento Gateway Command that performs gateway response verification. This may include low-level data formatting, security verification, and even the execution of some store-specific business logic.
The Response Validator returns a Result object with the validation result as a Boolean value and the error description as a list of Phrase.
Response Validator must implement Magento\Payment\Gateway\Validator\ValidatorInterface
Result class must implement Magento\Payment\Gateway\Validator\ResultInterface
An external API integration can have multiple response validators, which should be added to the provider’s validator pool using dependency injection via di.xml.
The following is an example of Response Validator:
public function validate(array $validationSubject)
{
$isValid = false;
$failedExceptionMessage = [];
if (isset($validationSubject['response']['error'])) {
$failedExceptionMessage = [$validationSubject['response']['message']];
} else {
$isValid = true;
}
return $this->createResult($isValid, $failedExceptionMessage);
}
The above class is extending the \Magento\Payment\Gateway\Validator\AbstractValidator class which has the “createResult” method that returns a ResultInterface as the response of the method.
To summarize the above operations, we have used Magento’s Gateway command feature which was initially developed for implementing payment gateways and utilized it for a custom API call to an external system from our Magento application. We used virtualType and type in di.xml to define the CommandPool which defined our set of commands, GatewayCommand which was the actual API command, RequestBuilder which created the request payload for the API, TransferFactory which merged all the request data and sent to gateway client, the we used the Zend Client to convert the data to JSON format. Response handler, which was used to save the response data in the cache for further use. Response Validator, to check the data received for integrity.
Below is an example of the source of the API call where the API call starts its procedure:
public function execute(array $commandSubject)
{
/**
* Setting a default request_type if not present
*
* @var string
*/
$requestType = (isset($commandSubject['request_type']))
? $commandSubject['request_type']
: \Zend_Http_Client::GET;
/**
* Setting no extra headers if none defined
*
* @var array
*/
$headers = (isset($commandSubject['headers']))
? $commandSubject['headers']
: [];
$auth = (isset($commandSubject['auth']))
? $commandSubject['auth']
: [];
$transfer = $this->transferFactory->create(
$this->requestBuilder->build($commandSubject),
$commandSubject['url'],
$requestType,
[],
$headers,
[],
$auth
);
$response = $this->client->placeRequest($transfer);
$this->setResponse($response);
if ($this->validator !== null) {
$result = $this->validator->validate(
array_merge($commandSubject, ['response' => $response])
);
if (!$result->isValid()) {
$this->logExceptions($result->getFailsDescription());
// throw actual error response
$errorMessage = $result->getFailsDescription();
throw new CommandException(
__(reset($errorMessage))
);
}
}
if ($this->handler) {
$this->handler->handle(
$commandSubject,
$response
);
}
return $this;
}
All the classes required for a Gateway command to work need to be present in the Gateway Folder in your module. E.g: Vendor\Module\Gateway\. The folder structure can be as below:
The above process can be used to call any external or internal API for that matter. This method is a lot more structured way of calling an external API and it uses curl as the base as well.
Gateway Command was built for payment processing, but its structured, testable pattern makes it a solid choice for any external API integration in Adobe Commerce (Magento), not just payment providers.
Working on a custom API integration and want a second pair of eyes on the architecture? Codilar's Adobe Commerce (Magento) developers can help you get the structure right from the start.
No. While it was originally built for payment gateways, it works just as well for calling any external or internal API and processing the response.
Not always. Response Handler and Response Validator are often optional depending on your use case, but Request Builder, Transfer Factory, and Gateway Client are typically required to build and send the request.
Gateway Command gives you a more structured, testable, and reusable pattern (with separate concerns for building requests, sending them, and validating responses), instead of one large custom cURL implementation.
Yes. Multiple validators can be added to a validator pool via dependency injection, and ValidatorComposite lets you chain them together, with results aggregated into a single outcome.
Inside a dedicated Gateway folder (e.g., Vendor\Module\Gateway), with subfolders for Command, Http, Request, Response, and Validator, keeping each component's classes organized separately.

Get tailored technology solutions to scale your retail business online
Request A Quote

Stay ahead with insights, trends, and brand success stories from the world of Digital Commerce.


DTECH, Techno Hub 1, Dubai Silicon Oasis Authority, United Arab Emirates - Dubai - United Arab Emirates

Level 1, Building 7, Zone A Airport road, Business Gate P.O Box 93597 Riyadh 11683, KSA.


Codilar Digital Pte Ltd, 68 Circular Road, #02-01, 049422, Singapore

7th Floor, Jupiter Block Prestige Tech Park, Kadubeesanahalli, Bellandur Amtankere, Bengaluru, Karnataka 560103

Satrio Tower, Floor 6, Unit C and D, Desa/Kelurahan Kuningan Timur, Kec. Setiabudi, Kota Adm. Jakarta Selatan, Provinsi DKI Jakarta